
Replacing VAG Engine Mount Bearings Without Removing the Engine
Replacing the engine mount bearing in the subframe of Audi, VW, Seat and Škoda vehicles is often seen as a difficult and time-consuming workshop job. Different subframe generations require different centering, sealing and pressing methods, and incorrect handling can damage the subframe or the new bushing. With the correct engine mount bushing tool set, the repair can be carried out directly on the vehicle in a controlled, repeatable and professional way.
Why this repair needs a controlled method
The engine mount bearing, also called the torque mount bushing or subframe bushing, is pressed into the engine carrier. When worn, it can cause excessive movement in the drivetrain, vibration, knocking noises during acceleration or load changes, and reduced driving comfort. Because the bearing is located inside the subframe, many workshops consider the job risky or inefficient without the correct special tool.
The main challenge is not only pressing the old bushing out. The new bushing must also be compressed, centered and installed squarely into the carrier bore without tearing the rubber, deforming the sleeve or damaging the subframe. This is especially important because VAG vehicles use several carrier designs depending on model year, platform and subframe material.
Different VAG subframe generations, one common solution
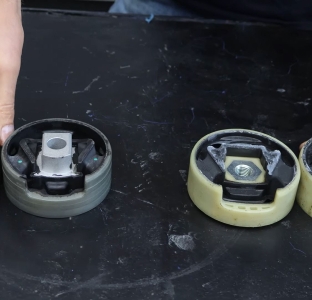
Engine mount bearings in VAG subframes are commonly found in three main carrier designs. Each generation requires a different approach to sealing, centering and supporting the bushing during installation.
This classic aluminum subframe design uses front mounting points that allow the bore to be sealed and supported externally during the installation process.
This steel subframe does not have the same front mounting holes, so the tool must seal and center internally to keep the bushing aligned during pressing.
Later aluminum carriers use reinforcement ribs and no external mounting points, requiring expandable sealing and locking tools for safe installation.
The Engine Mount and Subframe Bushing Tool Set for Audi, VW, Seat, Škoda and Ford is designed to cover Gen. I, II and III subframe constructions with one professional tool set.
Vehicle applications
These engine carriers are used across many VAG platform vehicles. Depending on the exact model, year, engine and carrier version, the applicable subframe design may differ. Always confirm the installed carrier type before starting the repair.
A3 from 2003, Q2 from 2016, Q3 from 2011, TT from 2006.
Alhambra from 2010, Altea from 2004, Ateca from 2016, Leon from 2005, Tarraco from 2018, Toledo from 2004.
Karoq from 2017, Kodiaq from 2016, Octavia from 2004, Superb from 2008*, Yeti from 2009*.
Arteon from 2017, Caddy from 2004*, CC from 2011, Eos from 2006, Golf from 2003, Jetta from 2004, Passat from 2005, Scirocco from 2008, Sharan from 2010, T-Roc from 2017, Tiguan from 2007, Touran from 2003.
Controlled removal without damaging the subframe
The removal process follows the same basic principle across all three carrier generations. The removal pressure piece is mounted from above, while the heavy-duty spindle and lower adapters are used to pull the old bushing out of the carrier in a straight, controlled movement.
Support the vehicle safely, remove the required underbody parts and create access to the torque mount and engine carrier. Inspect the carrier generation before selecting the correct tool configuration.
Install the upper removal pressure piece from above. Correct positioning is essential to keep the pulling force centered through the bushing and carrier bore.
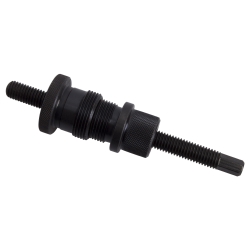
The M16 removal spindle, removal cone, adapter plate and bearing nut with ball bearing allow high pulling force while helping the bushing travel straight through the subframe.
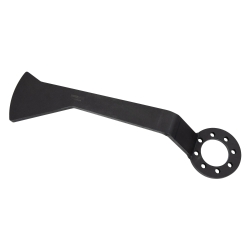
When the old bushing reaches the edge of the bore, it can be lightly split with a chisel. This reduces resistance and makes final pressing-out easier, especially on seized or heavily aged bushings.
Safe and precise installation
Installation requires more precision than removal. The bushing must be compressed, guided and pressed into the subframe bore until it sits correctly against the stop. For Generation II and III carriers, adapter rings are used where the bushing must sit flush in the carrier.
Lightly chamfering the outer edge of the bushing is recommended. Apply lubricant generously to reduce pressing resistance and help the rubber and sleeve enter the bore smoothly.
Use the thinner M12 spindle for installation together with the conical compression sleeve, installation pressure piece and the required adapter rings for the specific carrier generation.
Follow the markings on the bushing and tool components. Incorrect alignment can affect drivetrain support, cause premature wear or make the installation process unnecessarily difficult.
Continue pressing until the compression sleeve releases automatically and the bushing sits correctly against the stop. This gives the technician a clear confirmation that the installation position has been reached.
Tool design features that matter in daily workshop use
A professional bushing tool is not only about pressing force. Durability, serviceability and repeatable positioning are equally important when the tool is used regularly in a workshop environment.
Replaceable threaded inserts
If the thread in the press plate becomes damaged, the complete plate does not need to be replaced. The tool design uses replaceable threaded inserts that are secured with a set screw. This lowers long-term ownership costs and extends the practical service life of the tool.
Mechanical or hydraulic operation
The tool set can be used mechanically with the supplied threaded spindles or hydraulically where suitable workshop equipment is available. This gives workshops flexibility depending on available equipment and the condition of the bushing being removed.
One set for several carrier generations
Instead of using separate tools for different subframe designs, one complete set covers aluminum and steel carriers across Gen. I, Gen. II and Gen. III applications. This is especially useful for independent workshops working on a wide range of Audi, VW, Seat, Cupra and Škoda vehicles.
Recommended tool for this repair
For this job, we recommend the Engine Mount and Subframe Bushing Tool Set for Audi, VW, Seat, Škoda and Ford. It is designed for professional removal and installation of two-piece torque mount bushings located in the engine subframe.
- Professional tool set for engine mount and subframe bushings.
- Suitable for Audi, VW, Seat, Cupra, Škoda and Ford vehicles.
- Designed for Generation I, II and III subframe designs.
- Compatible with aluminum and steel subframes.
- Allows replacement directly on the vehicle.
- No subframe removal required.
- Can be used hydraulically or mechanically.
- Ideal for professional workshop repairs.
Need the tool for this repair?
Use a dedicated engine mount and subframe bushing tool set to replace VAG torque mount bushings directly on the vehicle, with controlled removal and precise installation across multiple carrier generations.

Post comment